Creating A Website with GitHub Pages and Jekyll
If you want to create a website similar to this one, here is a guide for how to do it. With GitHub, you can create and host a website for free! Though you don’t have to use Jekyll, I have found it to be best option and doesn’t require a ton of HTML and CSS. Instead, Jekyll uses YAML and Markdown. Don’t worry if you don’t know either one, I don’t either, not really! I know just enough to get by in creating my website, then I look up anything I don’t know. (Google-Fu is a necessary skill to have for any developer!)
Set up your GitHub Repository
-
Create GitHub account. My username is just my first and last name: brandonrasaka
-
Create new repo and name it
[username].github.ioFor example, mine is
brandonrasaka.github.io -
Download and install GitHub Desktop
-
When prompted, sign in to GitHub
-
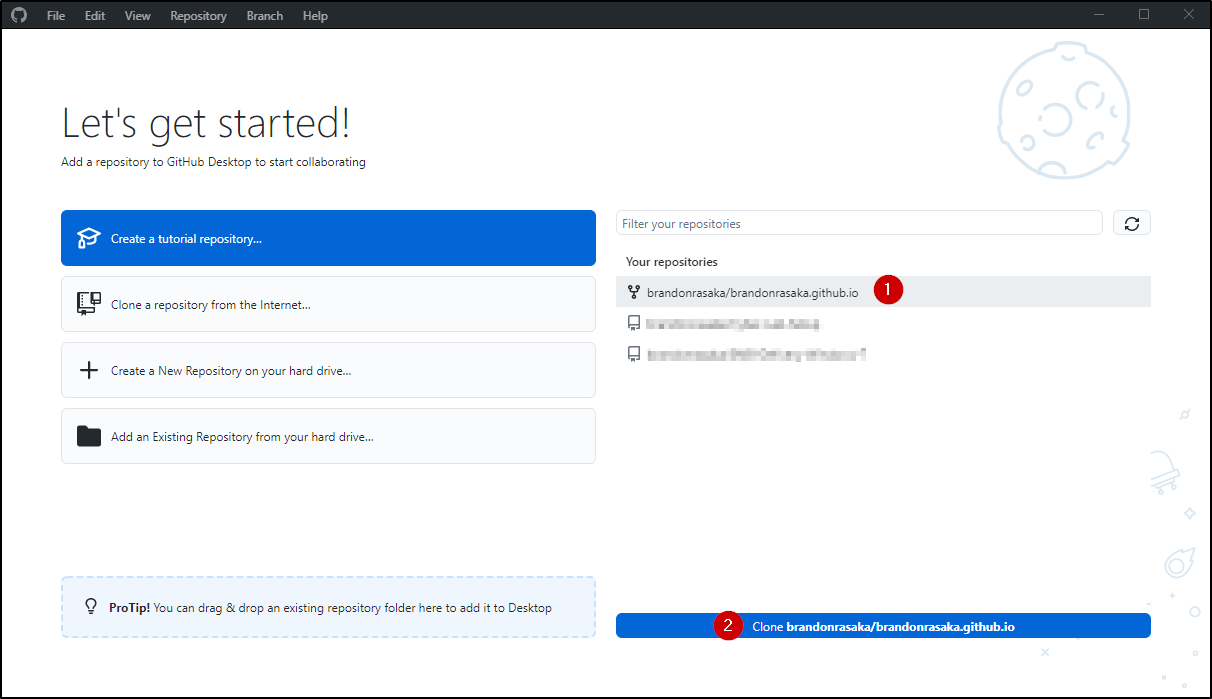
When it finishes installing, you will see a list of Your repositories, including the one you just made
-
Select it, then click the Clone button. This creates a new folder for storing all the files in the repo. Any changes you make in any file in the folder you can then “push” to the repo on GitHub

Install Jekyll
Note: it’s actually recommended you use a Linux machine for Jekyll, but I’m using Windows and these instructions are for Windows.
-
First you’ll need to make sure you have Git installed, which you can download at gitforwindows.org. Just click the download button and run the installer.
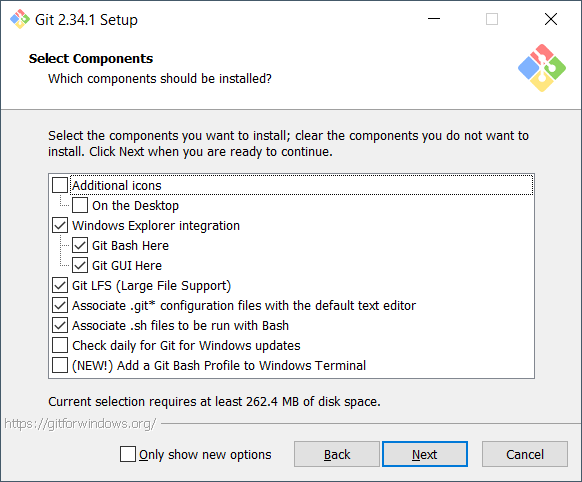
There are a lot of options in this installer, which I’m not going to go through for this post because most of them are irrelevant to Jekyll.
- You’ll want to at least make sure you check the Git BASH Here component

-
Download the recommended RubyInstaller + DevKit from the RubyInstaller Downloads page. At the time that I did this, the documentation on the page recommended the Ruby+Devkit 2.7.X (x64) installer for new users.
-
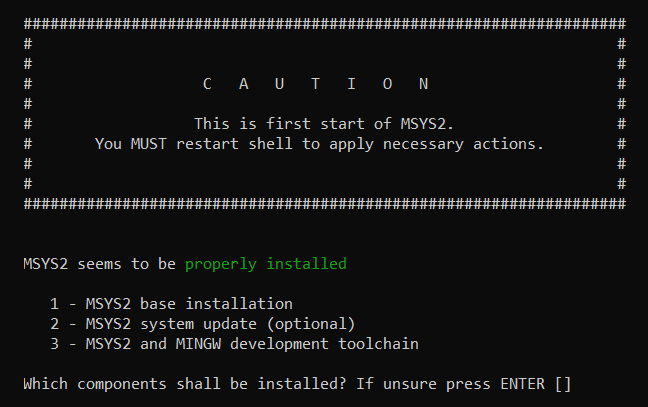
Run the installer after it finishes downloading. On the last step, make sure the
ridk installbox is checked. This will open a Command Prompt shell and begin another script.
-
In the Command Prompt, type
1then hitENTER. When that finishes, enter2, then3after that. -
After the last step, exit the window that ran the scripts, but then open another Command Prompt window. Verify that Ruby and Gem are both installed using these commands:
> ruby -v> gem -v -
Now install Jekyll, then verify:
> gem install jekyll bundler> jekyll -v -
Close Command Prompt and open Git BASH, then navigate to the directory with your GitHub repo and enter the following command:
> bundle install -
Now bundle the site’s contents and make it available on a local server:
$ bundle exec jekyll serve
Get the Hacker Theme and Start Customizing
-
Download Hacker theme from https://github.com/pages-themes/hacker
You can obviously pick your own theme and don’t have to use this one. There are a number of sources for downloading Jekyll themes, which you can Google-Fu for. Also, the Jekyll documentation site has a list of theme sources as well.
-
Extract the contents of the download to your repo folder
-
Navigate your web browser to
http://localhost:4000or127.0.0.1:4000. You should see the default home page of the hacker theme. -
Now it’s time to make changes to suit your needs. For this tutorial, I’ll be giving you the steps that I took to get my site how I like it, so make sure to tailor yours as needed. We’re going to be writing and editing files, so you’ll want a good text editor. Personally, I prefer to use VS Code, but Atom or Notepad++ work great too.
-
From the root directory, open the
_config.ymlfile. Edit its contents like shown below, but obviously change the information to match your needs, then save the file.title: Brandon_Rasaka description: Get to know me and check out some of the work I've done. show_downloads: true theme: jekyll-theme-hacker name: Brandon_RasakaThere are loads of more options you can specify in this file, but this is all I have for my simple site, and it’s the basics you’ll need for yours.
-
If you refresh your browser page, you should already see some changes. For example, the top line on the page (as well as the name of the site in the browser tab) will match the
titlevalue, and the second line will match thedescriptionvalue. -
Now let’s customize your homepage. Find the
index.mdfile and copy it, renaming ittemplate.md.You don’t actually have to copy it, but I find it helpful to keep a local copy of the style guide.
-
In
index.md, notice the first few lines are surrounded by thre dashes---. This is the front matter for your page. Every page in your site will contain front matter. My site’s home page (index.md) has the following front matter:--- layout: default title: Home nav_order: 1 ---Let me explain what each of these means.
-
Layout: There are different layout templates, usually multiple styles with each Jekyll theme. The Hacker theme has only two layouts that are nearly identical: default and post. The template for these is stored in the
_layoutsdirectory as HTML files, but there are several variables and scripts that use the Liquid language to call pages and variable from elsewhere in the site. For example, thedefault.htmllayout has this line:{% include header.html%}This tells it to insert the contents of
_includes/header.htmlat that point, which itself is more HTML. So you can nest HTML within HTML using these variables. -
Title: This is pretty self-explanatory. It’s the title of the page. But more importantly, it’s also a variable that can be called elsewhere. For example, my
_includes/header.htmlfile contains the following loop:<nav class="main-nav"> <ul> {% assign navigation_pages = site.html_pages | sort: 'nav_order' %} {% for p in navigation_pages %} {% if p.nav_order %} <li><a href="{{ p.url }}" {% if p.url == page.url %} class="active"{% endif %}>{{ p.title }}</a></li> {% endif %} {% endfor %} </ul> </nav>I’m not going to explain every element in this bit of code, but notice the
{{ p.title }}in the<li>line. That’s part of an If-THEN statement in a FOR loop that is calling each Markdown (.md) pagepin the root directory (known as navigation pages) and using theirtitlevariables as the name of each link in the navigation bar in the header of every page. -
nav_order: I’ll be honest, I don’t remember if this was part of the default front matter when I downloaded the theme, or if it’s something I added later. But this tells the above loop in which order to display the links for each navigation page. So my home page (index.md) has
nav_order: 1, my About Me page (about.md) hasnav_order: 2, and so on.
-
-
Below the front matter you can use Markdown language to fill in your home page with the content you want, following the theme.md page as a guide. The beauty of using Jekyll is that you don’t have to write HTML for every single page. The more HTML, CSS, Javascript, Liquid, Markdown, and YAML you know, the more creative you can get. But with a pre-made theme you can get to work with very little extra effort if your knowledge of these languages isn’t up to snuff. I’m still pretty new to all of these languages, and yet I built this website!
I did tweak my header quite a bit, so I had to tinker with the HTML and CSS quite a bit to get it how I liked it, so my header won’t be quite the same as yours even if you’re using the Hacker theme.
-
At this point you can make as many navigation pages as you like. Just give them a
.mdextension and store them in the repo’s root directory. Make sure to edit the front matter appropriately and you’re good to go!
Start Blogging
Okay, so now you’ve got navigation pages, it’s time to start blogging. Now, I don’t use my website as a blog, per se, but I use the blogging functionality. As you can see, I use it to post my projects and tutorials. But Jekyll has some great functionality for blogging.
-
To write your first blog post, make a new Markdown file in the
_postssubdirectory, giving it a name with the date for a suffix in the formatyyyy-mm-dd. For example, the filename for this page is2021-09-01-creating-site-with-github-pages.md. -
Give the page some front matter. Again, using this page as an example, the front matter is
 ---
 layout: post
 title: "Creating A Website with GitHub Pages and Jekyll"
 permalink: /:year/:month/:day/:title/
 ---
The layout and title variables are the same as before, but now there’s a new one: permalink. This tells the site what the URL for this page (after the domain name) should be, which you can verify by checking the URL in your browser right now.

-
Just like with the navigation pages, here’s where you can enter your post’s content.
Add Social Icons
I have social media icons in my footer that are links to my profiles on the respective sites. I use Font Awesome for these icons, which is a collections of icons, many versions of which are free. Generally, to use Font Awesome icons, you would include a certain CSS tag within the <head> tag of your HTML, then you would link to the icon you want within the body. With Jekyll, you do the same but instead you’re going to add it to your layout. Because you’re using Markdown for all your pages.
-
Open the
_layouts/default.htmlpage. -
Within the
<head>tag, add the following:<link rel="stylesheet" href="https://cdnjs.cloudflare.com/ajax/libs/font-awesome/4.7.0/css/font-awesome.min.css"> -
To get yours like mine, open the
_includes/footer.htmlpage (if the theme doesn’t come with a footer page, then create one) -
Add the following, but changing the URLs to match your own profiles and email address:
 <p>
     <a id="social" href="mailto:brandonrasaka@protonmail.com" target="_blank" rel="noopener noreferrer"><i class="fa fa-envelope"></i></a>
     <a id="social" href="https://www.linkedin.com/in/brandonrasaka/" target="_blank" rel="noopener noreferrer"><i class="fa fa-linkedin-square"></i></a>
     <a id="social" href="https://github.com/brandonrasaka/" target="_blank" rel="noopener noreferrer"><i class="fa fa-github"></i></a>
     <a id="social" href="https://www.youtube.com/c/BrandonRasaka" target="_blank" rel="noopener noreferrer"><i class="fa fa-youtube-play"></i></a>
 </p>
This will add icons for email, LinkedIn, GitHub, and YouTube. Plus, each icon is a link to my profile on each site. You might want to add others, so here’s a list of Font Awesome icons and their names. To use one, just make sure the name listed follows the
fa-in the<i>tag. For example, if I wanted to use the Reddit icon (), I would type:<i class="fa fa-reddit-alien"></i>
Final Thoughts
That’s the basics! I hope this is a helpful tutorial for anyone looking to make and host a free website on GitHub! If you are using the Hacker theme, I’ve added a couple additional elements to my theme.md page beyond what the theme originally has. They are listed below.
Have fun!
Additional Hacker Theme Elements
To see the syntax for these, feel free to download my version of theme.md from my GitHub.
Use HTML and CSS to make a Linux-style Terminal box
$ cat /etc/passwd{% Liquid tags within a Jekyll post %}