LAMP Stack with Customized DVWA
Currently, I’m working for both Pacific Northwest National Laboratory and Marcraft, an Educational Technologies Group company. For both jobs recently, I had the opportunity to set up multiple web servers in Linux. For one of these projects I also set up a whole LAMP stack and the Damn Vulnerable Web Application (DVWA), but I wanted to customize it with a new look. I also wanted to have a fake front end website that has a link for “employees” to login with, which would take them to the DVWA login page.
For starters, I’m most familiar with Ubuntu and CentOS 7, so I started this project in Ubuntu (not Ubuntu Server, which was probably a mistake). I tried and failed probably 5 times to get MySQL or MariaDB set up! So then I used CentOS 7 and it worked. Soon I’ll do it all again either with CentOS Stream or with Rocky, but for now it’s CentOS 7.
A few things to note:
- Somebody else created the web files for the front end for me, I just added them to the right directories.
- I’m working on a Windows 10 machine running VirtualBox and building the server on a VM
- I’m writing this as a step-by-step tutorial
- Turns out the boss wanted the VM on Hyper-V, so there’s instructions for how to convert it for Hyper-V
Alright, here we go!
Set up the DVWA
-
Download the VirtualBox OVA file from Linux Images
Note:
I used the Minimal Install to save on storage and memory resources, but you can use a desktop environment if you want
- Import the VM from the OVA file
- Open VirtualBox and click File > Import Appliance
- Click the Browse icon and locate the OVA file, then click Import
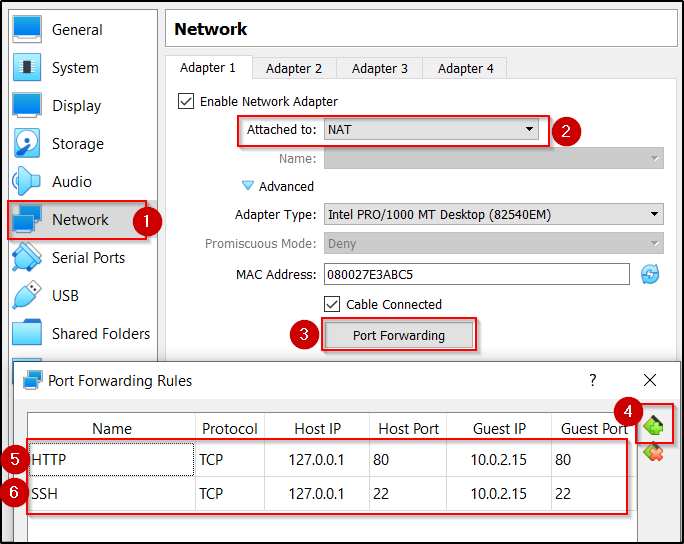
- Change the Network Adapter
- Open the VM Settings
- Click Network, then select NAT from the Attached to: dropdown menu
- Click the right-pointing arrow next to Advanced, then click Port Forwarding
- Click the icon to add two new rules, then use the variables in the table below:
Name Protocol Host IP Host Port Guest IP Guest Port HTTP TCP 127.0.0.1 80 10.0.2.15 80 SSH TCP 127.0.0.1 22 10.0.2.15 22 - Click OK, then click OK again

- Take a snapshot
- With the VM highlighted, click the icon on the right side with 3 dots and horizontal lines, then click Snapshots
- On the new screen, click Take, then give it a name such as Fresh Install, then any comments if you wish

- Start the VM and login with the following credentials:
- User: centos
- Password: centos
-
Update the repositories, then install the needed packages:
$ sudo yum update$ sudo yum install nano git httpd mariadb-server mariadb php php-mysql php-gd -
Start the Apache service and allow it to start automatically on reboot:
$ sudo systemctl start httpd.service$ sudo systemctl enable httpd.service -
Start the database service:
$ sudo systemctl start mariadb -
Run the MySQL security script:
$ sudo mysql_secure_installation- When prompted for root password, simply press
ENTER - When asked to if you want to create a root password, enter
y, then enter a password - Press
yat each prompt to remove some sample users and databases and disable remote root logins
- When prompted for root password, simply press
-
Enable MariaDB to start on boot:
$ sudo systemctl enable mariadb.service -
Restart the Apache service:
$ sudo systemctl restart httpd.service -
Open MariaDB to create the DVWA database:
$ mysql -u root -p- Enter the password you entered in step 12b above
-
Create the database:
>> create database dvwadb;This can be any name, but whatever you use, take note – it must match a configuration file later on.
-
Create DVWA database user with all the privileges assigned on the DVWA database:
>> grant all on dvwadb.* to dvwamgr@localhost identified by 'mypassword';Again, the username (dvwamgr) and password (mypassword) can be whatever, as long as you take note of it and match it to the config file
-
Reload the privileges table and exit:
>> flush privileges;>> exit -
Open the php.ini file, then edit the specified lines as necessary:
$ sudo nano /etc/php.iniallow_url_fopen = On allow_url_include = On -
Press
ctrl + x, theny, thenENTERto exit and save changes -
Download the DVWA files:
$ cd /var/www/html$ sudo git clone https://github.com/ethicalhack3r/DVWA -
Rename the sample configuration file, then open it and edit the following variables to match the database name, username, and password you used above:
$ cd /var/www/html/DVWA/config$ sudo cp config.inc.php.dist config.inc.php$ sudo nano config.inc.php$_DVWA[ 'db_database' ] = 'dvwadb'; $_DVWA[ 'db_user' ] = 'dvwamgr'; $_DVWA[ 'db_password' ] = 'mypassword'; -
Restart the database and web services:
$ sudo systemctl restart mariadb httpd -
Configure SELinux with the following commands:
$ sudo setsebool -P httpd_unified 1$ sudo setsebool -P httpd_can_network_connect 1$ sudo setsebool -P httpd_can_network_connect_db 1 -
Give Apache ownership of all web server files:
$ sudo chown -R apache:apache /var/www/html -
On the host, navigate to 127.0.0.1/DVWA in a web browser
-
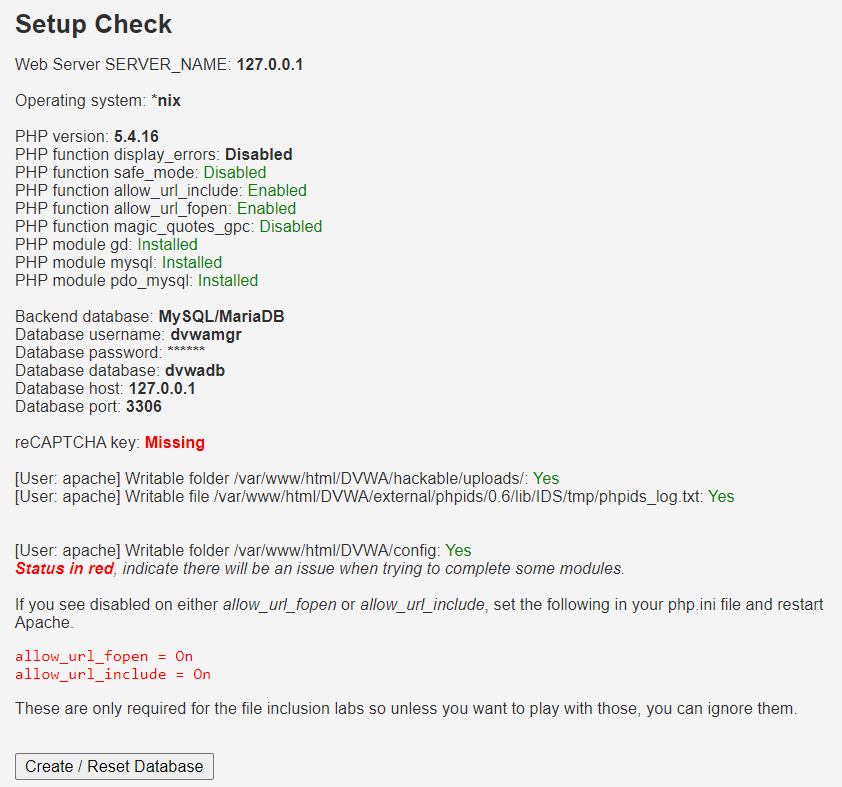
On the Server Check screen, make sure the only variables in red are the same as the ones displayed in the screenshot (reCAPTCHA key, allow_url_fopen = On, and allow_url_include = On)

- Click the Create / Reset Database button. When the page refreshes, it will take you to the DVWA login page
At this point, the DVWA has been set up and is ready for use. However, I mentioned in the beginning that I wanted to customize it with a new theme and new logo.
Customize the DVWA
For my style, I wanted to change the colors to a blood red and change the logo to one for the traditional fake company: ACME.
-
On the VM, backup the original logos:
$ cd /var/www/html/DVWA/dvwa/images$ sudo mv login_logo.png login_logo.png.bak$ sudo mv logo.png logo.png.bak -
On the host, open WinSCP and login to the VM
-
Copy the logo.png file from the host machine to the home directory of the VM
-
On the VM, you should still be in the /var/www/html/DVWA/dvwa/images directory. Move the logo.png file to the directory, then copy it as login_logo.png:
$ sudo mv ~/logo.png ./$ sudo cp logo.png login_logo.png -
Change the display size of the logo.png image:
$ cd /var/www/html/DVWA/dvwa/includes$ sudo nano dvwaPage.inc.php- On line 302 (press
alt + cto display line numbers), add width="150" to the line so that it reads:<img src=\"" . DVWA_WEB_PAGE_TO_ROOT . "dvwa/images/logo.png\" alt=\"Damn Vulnerable Web Application\” width=\"150\" />
- On line 302 (press
-
Change the display size of the login_logo.png image:
$ cd /var/www/html/DVWA$ sudo nano login.php- On line 83, add width="150" to the line so that it reads:
<p><img src=\"" . DVWA_WEB_PAGE_TO_ROOT . "dvwa/images/login_logo.png\" width=\"300\" /></p> -
Edit the colors in the CSS:
$ sudo nano /var/www/DVWA/dvwa/css/main.css- Line 19: color: #ac2424;
- Line 121: background: #ac2424;
- Line 122: border-bottom: #2f1912;
- Line 171: background-color: #ac2424;
- Line 195: border-top: 5px solid #ac2424;
Sweet! That was easy. Now we have a new ACME logo and a red color theme. You might need to restart the Apache service, then you can reload the browser to see the new look.
Adding a fake front end
The idea with this is to provide some OSINT practice and multiple layers of attack. Like I said in my intro, somebody else made the web files for me, which I’ll just refer to as ACME web files. To maintain the theme that the DVWA is actually the inside portion of an employee portal, I’m going to change the names of the buttons in the main DVWA menu.
-
Use WinSCP from the host to copy the folder containing the ACME web files to the home directory of the VM
-
Copy the ACME web files to the Apache directory:
$ sudo cp -R ~/ACME/* /var/www/html/ - Change directory:
-
Open the dvwaPage.inc.php config file to change the button names:
$ cd /var/www/html/DVWA/dvwa/includes$ sudo nano dvwaPage.inc.php -
Edit the button “names” according to the table below, modifying only the parts highlighted in the example.
Note:
The first button, Brute Force, is on Line 199
Original line:
$menuBlocks[ 'vulnerabilities' ][] = array( 'id' => 'brute', 'name' => 'Brute Force', 'url' => 'vulnerabilities/brute/' );Modified line:
$menuBlocks[ 'vulnerabilities' ][] = array( 'id' => 'brute', 'name' => 'Admin Login', 'url' => 'vulnerabilities/brute/' );Orginal Button Name Modified Button Name Brute Force Administrator Login Command Injection Network Tool CSRF File Inclusion File Upload Insecure CAPTCHA SQL Injection ACME Catalog SQL Injection (Blind) — Weak Session IDs XSS (DOM) XSS (Reflected) XSS (Stored) CSP Bypass Javascript Note:
The Modified values in this table are only suggestions, and is incomplete. You will need to come up with ideas for the rest.
-
On the host, type up the text for a replacement message of the DVWA homepage, which you will insert into the index.php file on the server.
-
On the VM, make a backup copy of the index.php file:
$ cd cd /var/www/html/DVWA$ sudo cp index.php index.php.bak -
On the host, use WinSCP to pull a copy of the index.php file to the host.
-
On the VM, delete the original index.php file:
$ sudo rm index.php -
On the host, open the index.php file in a text editor such as Notepad, Notepad+, etc, then edit it with the replacement message, being careful to use the appropriate html tags and to not delete necessary portions.
-
Using WinSCP, copy the modified index.php file back to the /var/www/html/DVWA directory on the VM
-
Shutdown the VM:
$ shutdown now - Take another VM snapshot, giving it a relevant name
All done!